Advice on how to use E-Prime in time-critical experiments
E-Prime is very easy to use and can time events with good accuracy, but sadly not with the default settings. If your experiment involves presenting stimuli or getting responses from the subject, and you need this done with ms accuracy, please read the following recommendations.
Using Pre-Release
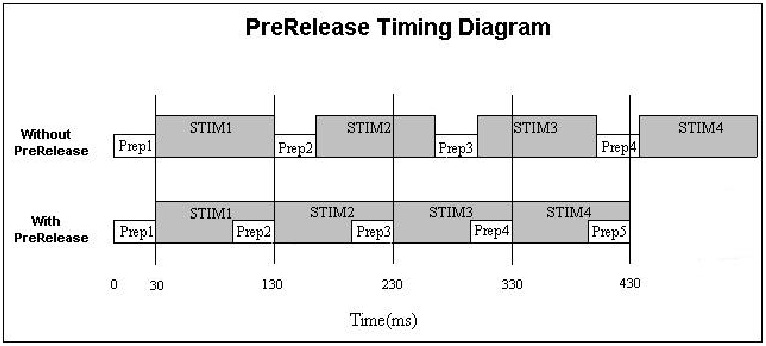
E-Prime doesn’t prepare any event. It only deals with things as it encounters them. So, playing a soundfile or displaying a large image could introduce significant delays into your script. Pre-Release is designed to prevent this, as it allows the preparation of the next item before the end of the current one.
Pre-Release can be set in the ‘Duration/Input’ input tab of the properties of an object.

A pre-release value of 100-200 ms is recommended before any event that needs some preparation, like presenting pictures, soundfiles or complicated text, or events that require some logging.
The delay before the first event is unavoidable, except by adding an extra event just to take care of this.
Timing Modes
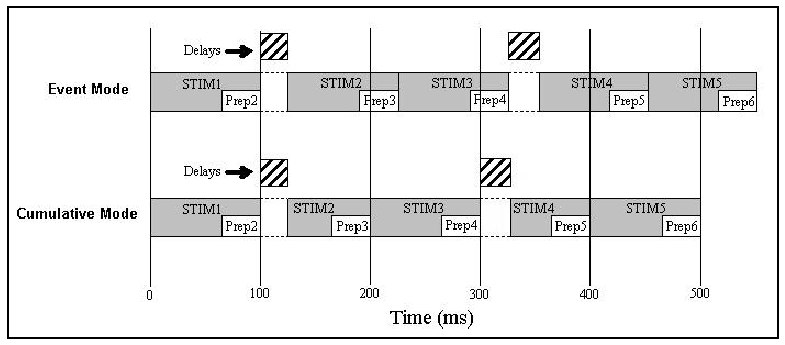
E-Prime knows three timing modes, to enable it to deal with delays.
1.Event timing mode, where the total duration of an event is maintained.
2.Cumulative timing mode, where a delay is compensated for by shortening the duration of a subsequent event.
3.Custom mode timing enables you to insert an end time for an event in the E-Prime script.

Logging
Logging the actual timing of all events is very important, to make sure that errors do not go unnoticed.
Make sure to log:
OnsetTime
OnsetDelay
- Duration Error
Sadly, logging of all scanner pulses isn’t possible
Pre-Loading items in E-Prime
If you want to make sure that your item will start with the minimum amount of delay, a good solution is to pre-load sound files and images. Create an inline object and insert it at the beginning of the trial, well before the actual events.
The code for loading images and sound files is given below. You will need to change the names of the SoundOut and ImageDisplay objects to the ones used in your script, and also the names of the attributes that hold the filenames.
This example shows how to preload soundfiles:
'Get the soundbuffer from the soundout object
Dim SBuffer as SoundBuffer
Set SBuffer = SoundOut1.Buffers(1)

'Assign the new filename (where Stimulus is name of attribute on list that lists sound files)
SBuffer.Filename = c.GetAttrib("Stimulus")

'Instruct the object to load the sound contents into its internal structures
SoundOut1SoundBuffer.Load
And here’s how to preload images:
'Retrieve the image filename from the Context
Dim strImageFileName As String
strImageFileName = c.GetAttrib("imagefilename")

'Assign the new filename and instruct the object
'to load the image
ImageDisplay1.Filename = strImageFileName
ImageDisplay1.Load